Showing posts with label Equipment. Show all posts

Monday, October 24, 2011

The polarizer: the magic autumn filter

If you only own one filter, make it a polarizer.  Polarizers, in short, remove reflections and glare.  The effect varies depending on what is being photographed, how high the sun is, and what direction the camera is facing, but in general, skies become darker, allowing clouds to be more prominent, glare and reflections disappear from water (allowing a clear view into streambeds among other things), and makes colors more vibrant and increases contrast.  This is a wonderful filter to use to bring out autumn color. 

Note that there are two types of polarizer filters: linear and circular.  Modern cameras require a circular polarizer in order to focus and meter properly.  Circular polarizers consist of two filters fastened together, one of which fastens to the camera and the other rotates freely.  Rotate the outer filter to acquire the polarization effect.  Polarizers work best at an angle facing 90 degrees from the sun, but the effect is still strong for some distance around the 90 degree mark. The effect of reflections on water is also affected by the angle of the camera to the water surface.  Shooting down on a body of water from a height will yield a more dramatic effect than shooting horizontally across the surface.  Fortunately you can see the polarization through the camera, so you can try various adjustments and angles to get the desired effect.

Below is a shot of Tupper Lake in the Adirondacks of New York, in the late morning, using a polarizer.  Although this shot illustrates the use of a polarizer to enhance skies, it also illustrates a potential pitfall of using a polarizer, especially with a wide-angle lens.  Due to the wide angle and also the angle I was facing, the effect is not uniform, growing darker to the left side.  While this can be corrected in post-processing, naturally it's ideal if the polarizing effect is more uniform.  Due to the low-angle to the water, the reflections on the lake were darkened but preserved.


Most commonly, a polarizer is used in an open space when the sun is out, but just because you're in a deep forest or it's cloudy doesn't mean you should put it away.  Experiment!  Since they eliminate reflections on foliage, a polarizer can highlight forest scenes and autumn color, and although the effect is more subtle, they can have a beautiful enhancing effect even under lightly overcast skies.

Here's a shot taken at Fillmore Glen, in Moravia, NY, under overcast skies with a polarizer.  Note the lack of reflections in the water allowing the stream bottom to be visible, and the vibrant colors (which were not enhanced in post-processing):


Here's a pair of "before and after" shots from Fillmore, without post-processing other than sharpening.
First, without the polarizer:
And now with the polarizer:

Be aware that a polarizer also has another effect that may or may not be desirable... It adds about 1.5 stops to exposure time, necessitating either a wider aperature or a longer shutter speed!

Monday, April 4, 2011

A look at the Lowepro Slingshot 302AW camera bag

In my seemingly never-ending quest for just the right camera bag (which has been going on for over 20 years), I've finally acquired a couple now that I really like.  For casual outings with my standard kit - DSLR and 2 or 3 lenses, I pull out my Tamrac Velocity 8x.  But for more serious endeavors - hiking some distance or carring more gear, I like to have a backpack.  Up until recently I was using a Lowepro Orion AW, which is an interesting 2-piece item, with a small daypack on top for lunch, bugspray, etc., and the bottom is a large fanny pack, where the camera gear goes.  It's very comfortable to have on, even heavily loaded.  The problem is that it's hard, though not impossible to get at the gear without putting the bag down.  One has to reach back with both hands and unfasten two clips above the hips, loosen the belt, spin the fanny pack around, and unzip it, all while trying to avoid dislocating one or both shoulders.

Lowepro's Slingshot line uses the messenger bag concept where the strap goes over the head to the opposite shoulder from the camera, and allows the photographer to loosen the strap slightly and spin the bag around to the front of the body, where a door can be opened and the camera pulled out.  (My Tamrac Velocity uses this same concept.)  But with the two smaller Slingshots, the weight still lies solely on one shoulder, which is, literally for me, a pain in the neck.  But the 302AW model also has a nice thick waistbelt to help distribute weight.  Some folks find this an annoyance because it needs to be unfastened to move the bag to the front, but this seemed a small price to pay in my own situation.

If you are new to shopping for a camera bag, here's a tip - take your gear with you when you go, to try it in your bag of choice before you buy, because any camera bag will feel quite different fully loaded than empty.  (I always ask before doing this, and also let the clerk know that I've just walked in with a bunch of my own camera gear, just so there aren't any unfortunate misunderstandings!)

The waistbelt on the Lowepro 302 works like a charm.  I've been able to happily walk for hours with it quite heavily loaded with no ill effects on my neck.  The bag has a remarkable amount of space (I use both the small upper pocket plus some of the lower area for non-photographic items) and it even has a built in raincover.  There is a tripod holder on the side opposite the flip door, but be aware that it does not appear to be designed for normal-sized tripods with lever leg releases.  My Manfrotto 190CXPRO4 which has levers, only fits with a great deal of fussing and cramming.  As with other Lowepro bags, there is a built-in micro-fiber cloth conveniently located next to the camera for cleaning lenses and LCD screens, media card holders inside the lid, and there's a small flat pocket on the outside at the top.  There are no dedicated drink holders, but I've attached a water bottle to the tripod holder clip, as well as to the belt, and once put a small bottle inside in the top.  Less-used items can go in the tertiary pocket on the front, but be careful opening that pocket with the pack "slung" to the front.  Unzip it too far, and things may fall out.  One small gripe I have is that the material on the inside of the organizers in that pocket is very slick and with the bag "slinging" from my back to my front regularly, I may open that pocket and find everything has come out of the organizers and is loose and jumbled.  Note - the main pocket has two locking straps that allow access when "slung" to the front, but which prevent unexpected wider unzippings. It is easily possible to get into the two lens compartments closest to the side door when the bag is slung in front by pulling the velcro dividers back.

Here's the outside of the bag.

 Here's the back.  Note the nice, cushy thick straps!
Here's what you see when the bag is slung around to your front and opened. For size comparison, that's a Canon 60D:
Here's the main compartment fully opened. A 17-85 is mounted on the camera in the center, the 10-22 is to the right, and the 70-200 F4L is under the shelf on the left. Mini survival kit is the orange thing at the back on the right.  There is still plenty of room on top of the 70-200 for a flash or, in my case, a very compact extra jacket often lives there.   Note that the dividers can be positioned vertically for shorter lenses, as on the right side here or horizontally for longer lenses, as on the left side.
Here's my "wildlife photography" configuration.  By rearranging the velcroed partitions a little, I'm able to fit my hefty 400mm f5.6L lens on the left with a little space left on top of it.  The 70-200 F4L is mounted on the camera in the middle, with plenty of space on top of that.
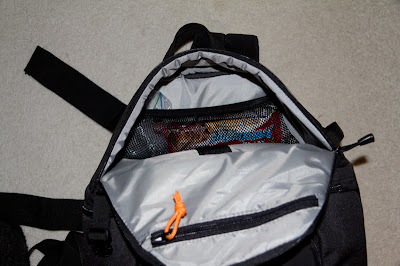
Here's the inside of the top. Just big enough for those all-important snacks.  Mesh pocket is along the back wall.

For more info and to see the bag actually in action, check out Lowepro's site (and no, they didn't pay me to post this!  I just liked their bag.)  Note that they now have an even bigger model, the 350AW, which can also hold a laptop.

Saturday, February 19, 2011

Prepare for those Unexpected Moments

Out in a canoe on a lake in the Adirondacks, we paddled along on a glorious summer day. I had my DSLR set up for shooting HDR, trying to capture cloud detail along with shadows in the deep woods along the shore. Small aperture, moderate shutter speed, ISO 100, exposure bracketing set to 2 stops over and under, all focus points active.  Then an osprey appeared.  It quickly flew to within 20 feet or so of the canoe and splashed into the water, where it briefly struggled with a fish. After staring in wonder and amazement for a moment, I replaced my mid-range lens with a telephoto, then fumbled through changing the camera settings - higher ISO, slightly over-exposed to compensate for bright sky, smaller aperture, turn off the bracketing, only center focus point active etc.  Meanwhile the osprey lifted out of the water with its catch, winged right over our canoe where it hovered for a moment (I'm sure with its tongue sticking out as I cursed and fumbled) then headed for shore.  My only shot was an underexposed, blurry image of the osprey's retreating backside.  It joins the two shots I have of the blurry retreating backsides of moose, a shot of a stump with the retreating backside of a squirrel that had been sitting there, the lily pad with no frog...  My attempts at wildlife photography have often been dismal, partly (mostly?) because that's not really my area of expertise, but also at least in part because I'm not always able to quickly adjust my camera for the unexpected both related to wildlife and other unanticipated happenings.

This was a factor in my choice of a new camera late last year. My Canon Rebel XTi has all the basics and a few bells and whistles as well, but it was unable to do more than one thing at a time - it had no way to save a configuration for quick recall. One difference between entry level cameras and those further up the sophistication ladder is indeed, this very capability. My new Canon 60D has one such custom setting. I can set up the camera in a desired fashion, save the settings, and then recall them later by turning the main program dial to "C". Since the vast majority of my missed opportunities seem to be related to action shots and wildlife, I've configured the "C" setting to what I would generally want for that sort of photography and now, with a quick lens change and a turn of the dial, I can switch from anything else I happen to be doing, to nab that osprey, moose or squirrel. Further up the camera sophistication line (in Canon-land anyway), the 7D and 5DmII each have 3 different configurations. (Nikon likely has similar capabilities, though I'm not familiar with them.)

Another useful customization found on a number of Canon cameras (and again, likely others as well) is the customizable menu option. On a modern DSLR there are an extraordinary number of menu items and it's easy to forget where something is and waste valuable time trying to find it. The "MyMenu" feature allows you to fill one menu screen with your most commonly used options.

Luck in photography, like so many things, stems in part from uncontrollable events, but it's tempered by being prepared to take advantage of unexpected moments. By the way, the panorama photo at the bottom of this page is from the same day in same general location that we saw the osprey!