Tuesday, August 28, 2012

Edge of the Wild
Travels in Western Newfoundland, Part 2
Across the Water

The Newfoundland ferries are immense. They are cruise ship-sized, oceangoing vessels capable of carrying 400 or more cars and trucks, and over 1,000 people. A crew of 90 or so live on the ship for several weeks at a time, and there are also cabins available for passengers, a particularly attractive feature during the long crossing to Argentia, near the capital city of St. Johns, a 14+ hour maritime extravaganza.
  
All three passenger ferries in port at North Sydney, Nova Scotia at once. The trucks on the left are waiting to board.
 Our destination was Port aux Basques, a mere 5 hour trip. The parking area in Nova Scotia sweltered in 90 degree heat as we waited in long lines of cars. When we finally drove into the cavernous interior of the ship, we followed the cars in front of us through a wide U-turn, whereupon we trundled into a narrow slot and down a ramp to a lower deck where we were backed into a far corner. Other cars packed in around us and as we left the truck to go upstairs, a huge door dropped down above, covering the slot and ramp we had come down, and cars and trucks were then parked all across the middle and upper decks. 

Quick shot out the window as we are about to board
 Our ferry, the "Blue Puttees", named after a valiant Newfoundland regiment in World War I, had 9 decks, and boasted two restaurants, a snack bar, a gift shop, a bar with live music, three huge lounges with large TVs and comfortable reclining chairs, a play room, and a sun deck on top, complete with a helicopter landing pad.

Not exactly "art" but interesting all the same: driving onto the ferry. I don't normally take photos while driving...
 We watched from the top deck as the ship slowly backed away from the dock and turned north. It was a stunningly glorious day as we sailed away from Nova Scotia, with barely a cloud in the sky and the hot sun beating down. We strolled the outside decks, exploring, chatting with other passengers and fretted about sunburn since we had no sunscreen.

Nova Scotia slowly sank into the sea astern, and eventually all land disappeared entirely. It was an exotic sensation for people unaccustomed to ocean travel to see no sign of land from horizon to horizon.

Out of sight of land. High contrast is a constant photographic challenge on a sunny day at sea. Shooting in raw and highlight reduction in Lightroom brought this under control.
 Several hours into the trip we were startled by the sound of a foghorn. We looked at each other in surprise, then out the window, which faced to the rear of the ship, at the clear blue sky. A moment later a thick gray curtain settled around us as we entered a fog bank. It wasn't long before it became so thick that from the windows at our seats the far end of the ship was nearly lost in the mist.

Getting close to Newfoundland!
 We arrived at Port aux Basques in early evening, the rocky shore of Newfoundland dimly appearing from out of the fog. Upon arrival in the small harbor, our gigantic ferry pinwheeled in place 180 degrees and backed into the docking area. We were the very last car off the ferry, waiting about an hour for the whole ship to empty out before we could drive off. The service road leading out of the ferry parking lot immediately becomes the Trans-Canada Highway going north, and so began our odyssey up the Great Northern Peninsula of the province. About 5 miles north of town the fog dissipated and the skies cleared, revealing the brilliant setting sun over the Gulf of St. Lawrence. A recurring theme of Western Newfoundland almost immediately became clear as we drove northward: the steep, rugged wilderness of the Long Range Mountains a few miles to the east of the road and the shore dotted with occasional small villages to the west. Civilization here is indeed a narrow strip of land between mountains and sea. 

The Long Range Mountains near Port aux Basques, the northernmost part of the Appalachian chain.


Wednesday, August 22, 2012

Edge of the Wild
Travels in Western Newfoundland, Part I

"You're going WHERE?"

"Newfoundland", I repeated. It's in Canada. It's the big island northeast of Nova Scotia."

My co-worker looked askance, but assured me he was happy I was finally getting a vacation. Wherever I chose to spend it.

The province of Newfoundland lies somewhat beyond the usual vacation psyche of many Americans and even quite a few Canadians. If it invokes any recognition at all, it often seems to have the reputation of being a barren, cold, windswept, storm-tossed isle. It is indeed, sometimes, all of these things. But it is also a land of spectacular, rugged beauty, warm, welcoming people, and a seemingly unending array of fascinating things to see and do.

In July, 2012 my wife and I journeyed to Newfoundland and spent 11 days on the western side of the island - all too little time. Although I had been there twice before in the early 1990s, I still feel like I have barely scratched the surface of this amazing place.

Our trip took us up the Great Northern Peninsula, up a 2-lane highway, 400 miles into progressively more and more remote locations. The highway runs through a narrow strip of civilization, sandwiched between the Long Range Mountains on the east and the sea on the west. Traveling up that way truly seems like a journey along the Edge of the Wild.

The next few blog postings will chronicle our adventures and hopefully provide some useful information for travelers and especially photographers who are considering heading up that way.

Quirpon, at the far northern tip of the island of Newfoundland, looking toward Labrador on the far horizon
 

Monday, April 30, 2012

Wetlands

Although most of my time these days seems to be taken up with designing a computer management system for my employer, I've managed to carve out enough time to participate in a project that is near and dear to my heart in several ways: conservation, the outdoors, and photography.  The local New York chapter of the Guild of Natural Science Illustrators is creating a traveling art show to highlight the preservation of wetlands across upstate New York.  The end result will be a series of paintings and drawings by the Guild members of species found in wetlands, along with my photos to provide additional context, illustrating different types of wetland environments.  We anticipate that the show will be first displayed in the Montezuma National Wildlife Refuge Visitors Center in April of 2013.

The project has given me a new appreciation for the beauty and complexity of the New York landscape and the variety of wetland types, even in a relatively small area.

Click here to visit the Guild's national web site (nothing yet about this particular art show, but the web site is interesting to explore.)

Here's my own gallery of wetlands shots, and below are a few samples.  Enjoy!

Pond near the south end of Indian Lake, along Rt.30 in the Adirondacks


Along Rt. 30 north of Long Lake in the Adirondacks


Near Goodnow Mountain, east of Blue Mountain Lake, in the Adirondacks


Sapsucker Woods in Ithaca


Sapsucker Woods in Ithaca


Von Egeln Preserve near Cortland.  Don't step off the trail here!

Sunday, December 18, 2011

Interesting mistakes

Sometimes a mistake can lead to some interesting creative exploration and even, perhaps, a pleasing image.  Two posts ago I illustrated a shot taken of a small stone building where I had bumped the tripod as I took the shot. Along those same lines, last summer, during my "weekend of the rental Panasonic GH2", I had a similar experience.  I was in a swampy area and it was excessively buggy.  At one point I was trying to take a shot in a fairly dim area, with a longer shutter speed, while being assaulted by mosquitos.  I ended up accidentally pressing the shutter as the camera spun about 90 degrees clockwise as I flapped my arms around trying to clear the bugs away from my head.  Here is the result:


With my finger on the delete button I paused a moment.  It was kind-of an intriguing shot, and compositionally, on some level, it worked for me in an otherworldly sort-of way.  I left it and walked on.  The more I thought about it the more I wanted to try to duplicate that effect.  In fact, it was quite tricky to do.  I'm really not sure how it happened the first time!  But here are the results of my efforts a bit further down the path (by the way, I did come to realize that other people tend to give wide berth to a photographer taking photos while waving the camera around wildly.)

This one is interesting in part because the center is quite sharp!  Almost like a lensbaby effect.


This last one is definitely a bit more like going down the rabbit hole!


The general idea was to use a longish exposure, and rotate the camera very quickly at the exact same time as pressing the shutter.  The original shot was 1/5th second, the second at 1/200th, and the third, at 1/20th.  It's amazing how far you can move a camera in a 20th of a second!

Monday, October 24, 2011

The polarizer: the magic autumn filter

If you only own one filter, make it a polarizer.  Polarizers, in short, remove reflections and glare.  The effect varies depending on what is being photographed, how high the sun is, and what direction the camera is facing, but in general, skies become darker, allowing clouds to be more prominent, glare and reflections disappear from water (allowing a clear view into streambeds among other things), and makes colors more vibrant and increases contrast.  This is a wonderful filter to use to bring out autumn color. 

Note that there are two types of polarizer filters: linear and circular.  Modern cameras require a circular polarizer in order to focus and meter properly.  Circular polarizers consist of two filters fastened together, one of which fastens to the camera and the other rotates freely.  Rotate the outer filter to acquire the polarization effect.  Polarizers work best at an angle facing 90 degrees from the sun, but the effect is still strong for some distance around the 90 degree mark. The effect of reflections on water is also affected by the angle of the camera to the water surface.  Shooting down on a body of water from a height will yield a more dramatic effect than shooting horizontally across the surface.  Fortunately you can see the polarization through the camera, so you can try various adjustments and angles to get the desired effect.

Below is a shot of Tupper Lake in the Adirondacks of New York, in the late morning, using a polarizer.  Although this shot illustrates the use of a polarizer to enhance skies, it also illustrates a potential pitfall of using a polarizer, especially with a wide-angle lens.  Due to the wide angle and also the angle I was facing, the effect is not uniform, growing darker to the left side.  While this can be corrected in post-processing, naturally it's ideal if the polarizing effect is more uniform.  Due to the low-angle to the water, the reflections on the lake were darkened but preserved.


Most commonly, a polarizer is used in an open space when the sun is out, but just because you're in a deep forest or it's cloudy doesn't mean you should put it away.  Experiment!  Since they eliminate reflections on foliage, a polarizer can highlight forest scenes and autumn color, and although the effect is more subtle, they can have a beautiful enhancing effect even under lightly overcast skies.

Here's a shot taken at Fillmore Glen, in Moravia, NY, under overcast skies with a polarizer.  Note the lack of reflections in the water allowing the stream bottom to be visible, and the vibrant colors (which were not enhanced in post-processing):


Here's a pair of "before and after" shots from Fillmore, without post-processing other than sharpening.
First, without the polarizer:
And now with the polarizer:

Be aware that a polarizer also has another effect that may or may not be desirable... It adds about 1.5 stops to exposure time, necessitating either a wider aperature or a longer shutter speed!

Friday, October 14, 2011

Improving on Luck

How much of successful photography, especially nature photography can be attributed to luck?  You just happened to be at the right place at the right time to catch the right light.  Luck is certainly a factor, but you can influence how lucky you are with a little flexibility and preparation.  Keep a camera with you.  As you go to work and come home, especially in Spring and Fall, you may see the sun rising in the morning and setting late in the day as you commute (if you live in rainy Ithaca, NY, you probably see that maybe once a month...)  Be ready if opportunities present themselves.

This was taken one morning on my way to a woodcarving show with my wife.  A crystal clear morning at our house yielded to misty, dew-laden fields in the hills on the way to the show.
Don't wait for luck to happen - try to actively put yourself into situations when something fortunate might occur.  And even if the primary objective isn't working out, be alert for other situations.

This was taken early one morning along Lake Eaton in the Adirondack Mountains of New York.  Fog is one of the few things that will generally guarantee my ability to get out of bed at an early hour, and I had gone out early looking for misty woods shots.  While that didn't work out particularly well, I ran onto a lone loon floating on the lake along with a whole flock of mergansers having a morning spash.

Luck, for me, often seems to come in the form of things not going quite as planned.  While taking a photo of a small out-building at Great Camp Santanoni in the Adirondacks, I accidentally fired off a shot while still adjusting the camera.
Seems almost painterly.  The moral here is, keep an open mind!  What you get may not be what you intended, but it might be interesting in a different way.  Now here's the intended shot.  I don't think it's nearly as intriguing:
Be ready to improvise, change plans, quickly switch your gear and/or settings around, and nab the shot that appears, not the one you may have set up for.  In the shot below, along Lake Durant in the Adirondacks, I was all set with a telephoto zoomed in to capture the tall trees left of center against the sunset sky.  Then behind me I heard someone launching a canoe.  A mildly frantic lens change and reconfigure of the camera, followed by one quick test shot for exposure in this rather complex lighting situation, and I was ready just a moment before the canoe came into view:
Also don't get so caught up in your primary subject that you forget to look all around you.  Many years ago I was taking some shots on a bridge in Annapolis harbor with a friend, snapping away (with slide film at that time!) at an absolutely amazing sunset.  The light faded and we packed up and turned around to leave, and saw this:
We nearly missed what turned out to be one of the best shots of the evening.

So don't leave luck to chance!  Put yourself in positions where luck is more likely to strike, don't limit yourself to only your primary objective, be open to possibilities, don't dismiss your mistakes immediately, and be prepared for a sudden change of plan!  Oh and, don't forget to look behind you or you may miss the best shot!

Tuesday, August 9, 2011

The Keuka Outlet Trail

Whew... it's been awhile!  My "day job" seems to have taken over my existence this summer.  But I do hope to get back to more regular postings here.

A couple of posts ago I talked about a genre I've affectionately come to know as "old stuff in the woods", and for those who have a taste for both hiking and local history, spiced with the opportunity to nab some shots of crumbling ruins, overgrown stone walls, etc., something to look into is the Keuka Outlet Trail.  This is a 7.5 mile walk (or bike) on a smooth, fairly flat path following the outlet of Keuka Lake down about 270 feet in elevation, to Seneca Lake.  This small stream served as the hydro power for many old mills and factories from 1789 to 1968.  The trail passes right by several interesting ruins, a good-sized waterfall, and remnants of a canal with locks, and bits of an old railroad.  This starts as a somewhat urban and industrial walk through part of Penn Yan, along old railroad bridges and past warehouses, but quickly turns into a peaceful, heavily wooded walk, with occasional reminders of the area's past.

Note - do not assume that the visitor center in the old Kelly Tire buildings at about the halfway point is open!  Bring enough water for your whole adventure.  Also, bear in mind that the bulk of the old industrial sites are closer to the Penn Yan end.  I'm told that this is also a fantastic bike ride, but as I don't ride I wouldn't know!

Below are a few tidbits from our day walking through history.  And I promise I won't write about old rusty stuff for awhile after this!
Part of an old paper mill

Giant old flywheel in some brush

Some overgrown machinery near the paper mill

Much of the trail is quite idyllic.

This is a one-shot tone-map done with Photomatix Pro

Another one-shot tone-map.  This is behind the paper mill.  And yes, I was on very solid ground taking this shot!  If one is not exercising common sense, there are ample opportunities to get hurt on this trail. Signs do warn against entering the buildings.

Another one-shot tone-map. This is part of the Kelly Tire complex, a group of semi-intact buildings near the visitor's center.

For more info about the Keuka Outlet Trail and the history of the area, visit this link.  Also the Friends of the Keuka Outlet Trail have a site here.

Wednesday, May 18, 2011

The Finger Lakes Land Trust

If you live in or visit the Finger Lakes area of New York, and haven't discovered the Finger Lakes Land Trust, an introduction is in order.  This non-profit organization protects areas that are characteristic of central New York by acquiring land and making it available to the public, by establishing conservation easements on private land, and through helping to fund additional projects.  To date, the Land Trust has protected more than 12,000 acres, with a large variety of features including deep, dark forests, streams, winding gorges, waterfalls, old farmland, wetlands, etc.  Note that Land Trust sites are much less developed and more natural than the local state parks, and one should expect to take care around waterfalls and cliff edges, as there are no fences or warning signs.  Click here to visit their website.

Some of my favorite places to photograph around Ithaca are indeed, in Land Trust preserves.  The Sweedler Preserve at Lick Brook is a particularly stunning one, located a few miles up from Buttermilk Falls in Ithaca. Take Sand Bank to the intersection with Town Line, then turn right and go a few hundred yards to the bridge. Sweedler features a spectacular gorge and waterfall, along with a lovely winding stream with many smaller waterfalls.  1.3 miles of trails enables exploration of the stream as well as a neighboring, smaller gorge. 

A relatively new acquisition is the Roy Park Preserve, near Ellis Hollow, along Irish Settlement Road.  A short trail leads through fields and planted evergreens to an area of beautiful, mature forest, a lean-to, and two streams, one going through a small but picturesque gorge.

A few pictures of the Roy Park preserve can be found below, all taken near sunset.


Monday, April 18, 2011

Old Stuff in the Woods

 As anyone who looks at my photography can likely tell, I'm personally moved by the natural world - waterfalls, deep, dark evergreen forests, mountain streams, foggy mornings, and the joy of time spent in the ever more rare wilderness.  Most commonly this is where my inspiration arises.  And yet... There is something else.  A strange, unlikely genre that I find irresistable, for reasons that I can't fathom. It can only be described as "Old Stuff in the Woods".  Old, moldering buildings, walls, bits of machinery, rusted bits of cars, wells, pipes, ruined, crumbling factories, all overgrown with trees and brush.  Something, probably relating to two almost opposing interests of mine, archaeology and science fiction, conspires to draw me to capture such scenes.  It's a way to provide a window to the past, a reminder of where we've been, and at the same time a commentary on the future as well. I also confess to an interest in photos of "Urban Decay" (some fine examples here), turning something horribly ugly into fine, if poignant art, and perhaps this is simply an extension of that... 

Here are a few samples from my "Old Stuff in the Woods" collection.
 
Abandoned powerhouse at Sagamore, in the Adirondacks, NY

Girders in a pool in Watkins Glen State Park, NY

Old ironworks in the Adirondacks near the headwaters of the Hudson River, NY

Old ironworks in the Adirondacks, NY

Spring in Fillmore Glen State Park, NY

Monday, April 4, 2011

A look at the Lowepro Slingshot 302AW camera bag

In my seemingly never-ending quest for just the right camera bag (which has been going on for over 20 years), I've finally acquired a couple now that I really like.  For casual outings with my standard kit - DSLR and 2 or 3 lenses, I pull out my Tamrac Velocity 8x.  But for more serious endeavors - hiking some distance or carring more gear, I like to have a backpack.  Up until recently I was using a Lowepro Orion AW, which is an interesting 2-piece item, with a small daypack on top for lunch, bugspray, etc., and the bottom is a large fanny pack, where the camera gear goes.  It's very comfortable to have on, even heavily loaded.  The problem is that it's hard, though not impossible to get at the gear without putting the bag down.  One has to reach back with both hands and unfasten two clips above the hips, loosen the belt, spin the fanny pack around, and unzip it, all while trying to avoid dislocating one or both shoulders.

Lowepro's Slingshot line uses the messenger bag concept where the strap goes over the head to the opposite shoulder from the camera, and allows the photographer to loosen the strap slightly and spin the bag around to the front of the body, where a door can be opened and the camera pulled out.  (My Tamrac Velocity uses this same concept.)  But with the two smaller Slingshots, the weight still lies solely on one shoulder, which is, literally for me, a pain in the neck.  But the 302AW model also has a nice thick waistbelt to help distribute weight.  Some folks find this an annoyance because it needs to be unfastened to move the bag to the front, but this seemed a small price to pay in my own situation.

If you are new to shopping for a camera bag, here's a tip - take your gear with you when you go, to try it in your bag of choice before you buy, because any camera bag will feel quite different fully loaded than empty.  (I always ask before doing this, and also let the clerk know that I've just walked in with a bunch of my own camera gear, just so there aren't any unfortunate misunderstandings!)

The waistbelt on the Lowepro 302 works like a charm.  I've been able to happily walk for hours with it quite heavily loaded with no ill effects on my neck.  The bag has a remarkable amount of space (I use both the small upper pocket plus some of the lower area for non-photographic items) and it even has a built in raincover.  There is a tripod holder on the side opposite the flip door, but be aware that it does not appear to be designed for normal-sized tripods with lever leg releases.  My Manfrotto 190CXPRO4 which has levers, only fits with a great deal of fussing and cramming.  As with other Lowepro bags, there is a built-in micro-fiber cloth conveniently located next to the camera for cleaning lenses and LCD screens, media card holders inside the lid, and there's a small flat pocket on the outside at the top.  There are no dedicated drink holders, but I've attached a water bottle to the tripod holder clip, as well as to the belt, and once put a small bottle inside in the top.  Less-used items can go in the tertiary pocket on the front, but be careful opening that pocket with the pack "slung" to the front.  Unzip it too far, and things may fall out.  One small gripe I have is that the material on the inside of the organizers in that pocket is very slick and with the bag "slinging" from my back to my front regularly, I may open that pocket and find everything has come out of the organizers and is loose and jumbled.  Note - the main pocket has two locking straps that allow access when "slung" to the front, but which prevent unexpected wider unzippings. It is easily possible to get into the two lens compartments closest to the side door when the bag is slung in front by pulling the velcro dividers back.
Here's the outside of the bag.

 Here's the back.  Note the nice, cushy thick straps!
Here's what you see when the bag is slung around to your front and opened. For size comparison, that's a Canon 60D:
Here's the main compartment fully opened. A 17-85 is mounted on the camera in the center, the 10-22 is to the right, and the 70-200 F4L is under the shelf on the left. Mini survival kit is the orange thing at the back on the right.  There is still plenty of room on top of the 70-200 for a flash or, in my case, a very compact extra jacket often lives there.   Note that the dividers can be positioned vertically for shorter lenses, as on the right side here or horizontally for longer lenses, as on the left side.
Here's my "wildlife photography" configuration.  By rearranging the velcroed partitions a little, I'm able to fit my hefty 400mm f5.6L lens on the left with a little space left on top of it.  The 70-200 F4L is mounted on the camera in the middle, with plenty of space on top of that.
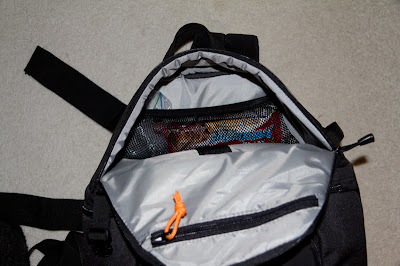
Here's the inside of the top. Just big enough for those all-important snacks.  Mesh pocket is along the back wall.

For more info and to see the bag actually in action, check out Lowepro's site (and no, they didn't pay me to post this!  I just liked their bag.)  Note that they now have an even bigger model, the 350AW, which can also hold a laptop.